Introduction
Rsync, or Remote Sync, is a free command-line tool that lets you transfer files and directories to local and remote destinations. Rsync is used for mirroring, performing backups, or migrating data to other servers.
This tool is fast and efficient, copying only the changes from the source and offering customization options.
Follow this tutorial to learn how to use rsync with 20 command examples to cover most use-cases in Linux.
Prerequisites
- User with sudo or root privileges
- Access to a terminal/command line
- SSH access for remote rsync examples
Rsync Command Syntax
The syntax for the rsync command changes depending on the usage of the tool. We will cover all the scenarios in the following examples. Rsync syntax in its most basic form looks like this:
rsync options SOURCE DESTINATIONRemote data transfers require you to specify a host’s address, but more on that later.
Rsync Options
The rsync tool comes with many options. You can enter rsync in your terminal and get all the details. We will list some of the most common rsync options.
These include:
-r | Allows to sync data recursively but does not keep ownership for users and groups, permissions, timestamps, or symbolic links. |
-a | The archive mode behaves like the recursive mode but keeps all file permissions, symbolic links, file ownership, etc. |
-z | Used to compress data during transfers to save space. |
-b | Performs a backup during data synchronization. |
-h | Shows the numbers in the output in a human-readable format. |
-n | Does a dry run. Used for testing before the actual synchronization takes place. |
-e | Instructs the rsync to use the SSH protocol for remote transfers. |
-progress | Displays the transfer progress during synchronization. |
-v | Verbose output. Displays the details of the transfer. |
-q | Used to suppress the output for the rsync command and options. |
Rsync Command Examples
Rsync is a versatile synchronization tool that you can customize to fit your specific use. In this guide, we will use the archive (-a) and verbose (-v) options when needed.
Refer to the rsync examples below to cover the majority of rsync usage.
Note: Be careful how you use the trailing slash in the source path when syncing directories. The trail plays an important role. If you enter the trailing slash on the source, the rsync command does not create the source folder on the destination; it only copies the directory's files. When you do not use the trailing slash, rsync also creates the original directory inside the destination directory.
1. Copy a Single File Locally
To copy one file to another directory on a local machine, type in the source file's full path, followed by the target destination.
For example:
rsync -v /home/test/Desktop/sample.txt /home/test/Desktop/rsync/
The command transfers the sample.txt file to the rsync directory. If the destination directory does not exist, add a slash at the end, and rsync will create it, as is the case in our example.
If you want to copy a file from the current working directory, you can enter the name of the file, not the full path.
2. Copy Multiple Files Locally
To copy multiple files with rsync, add full paths of the source files:
rsync -v /home/test/Desktop/sample.txt /home/test/Desktop/sample2rs.txt /home/test/Desktop/rsyncYou should use this method for a small number of files. If the list is larger, you can refer to the --exclude option.
3. Copy a Directory and All Subdirectories Locally (Copy Files and Directories Recursively)
To copy a directory and its contents to another location on your machine, use the -a or -r option. We used the archive option:
rsync -av /home/test/Desktop/Linux /home/test/Desktop/rsync
The example above shows how to copy the Linux directory to the rsync directory. Note we did not use the trailing slash after Linux. Hence, the rsync tool created the Linux directory and its content inside the rsync directory.
4. Copy a File or Directory from Local to Remote Machine
To copy the directory /home/test/Desktop/Linux to /home/test/Desktop/rsync on a remote machine, you need to specify the IP address of the destination.
Add the IP address and the destination after the source directory. Remember to put a colon (:) after the remote host's IP address, with no spaces before the destination.
The command looks like this:
rsync -av /home/test/Desktop/Linux 192.168.56.100:/home/test/Desktop/rsync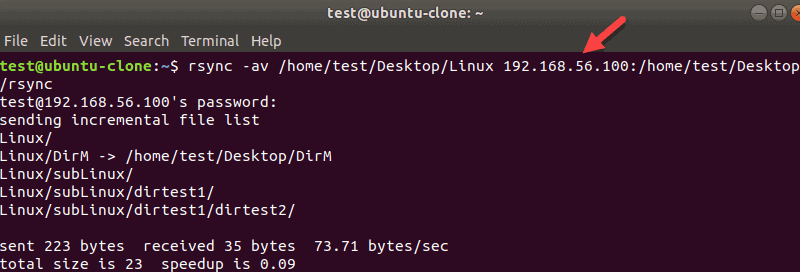
Enter the password for the current user to continue. If you want to use another account for the remote connection, specify it before the IP address:
rsync -a /home/test/Desktop/Linux [email protected]:/home/test/Desktop/rsyncTo copy a single file to a remote host, specify the full path of the file and the destination.
For example:
rsync -av /home/test/Desktop/sample_file.txt 192.168.56.100:/home/test/Desktop/rsync5. Copy Multiple Files or Directories from Local to Remote Machine
Similar to copying data locally, list multiple files or multiple directory paths you want to copy to a remote server. Follow the same syntax as with copying a single file or directory.
For example:
rsync -av /home/test/Desktop/Linux/ /home/test/Music 192.168.56.100:/home/test/Desktop/rsync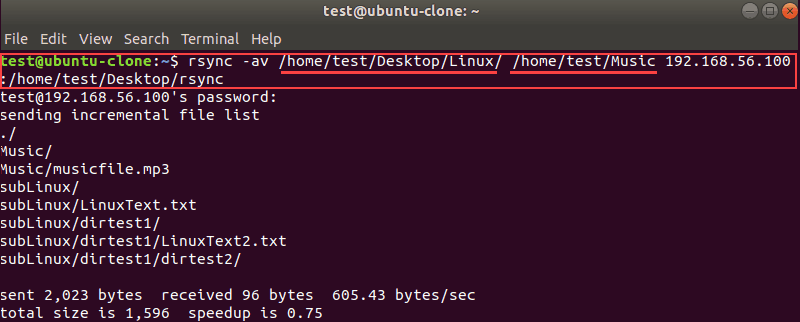
6. Specify rsync Protocol for Remote Transfers
The rsync tool can be instructed with the -e option to use a specific protocol for file transfers. To use Rsync over SSH to transfer files remotely, append -e ssh to the rsync command.
For example, to transfer sample.txt from your desktop to the desktop of a remote machine:
rsync -e ssh /home/test/Desktop/sample.txt 192.168.56.100:/home/test/Desktop7. Copy a File or Directory from a Remote to a Local Machine
Rsync supports transferring files from a remote server to your local machine.
To pull a directory from a server, specify its IP address before the source.
For example:
rsync -av 192.168.56.100:/home/test/Desktop/DirM /home/test/Desktop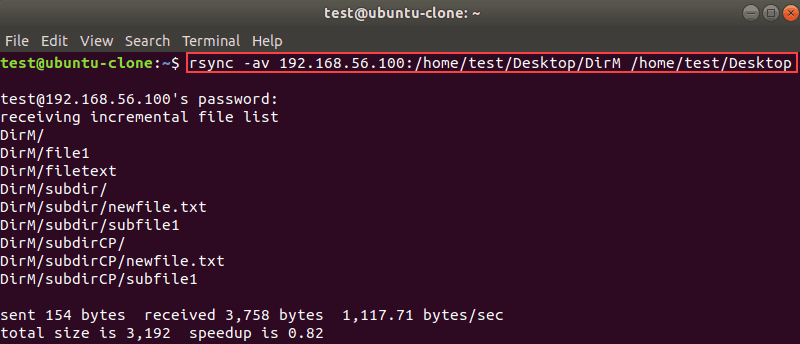
This command copied the DirM directory from 192.168.56.100 to /home/test/Desktop on a local server.
To copy a specific file from a remote host, enter the full path of the source file and the destination on your local machine. For example:
rsync -v 192.168.56.100:/home/test/Desktop/testfile.txt /home/test/Desktop8. Copy Multiple Files or Directories from Local to Remote Machine
To transfer multiple files or multiple directories from a remote server, list the paths using curly brackets after the IP address of the server. Separate the paths with a comma.
For example:
rsync -av 192.168.56.100:{/home/test/Desktop/DirM,/home/test/Desktop/Dir1} /home/test/rsync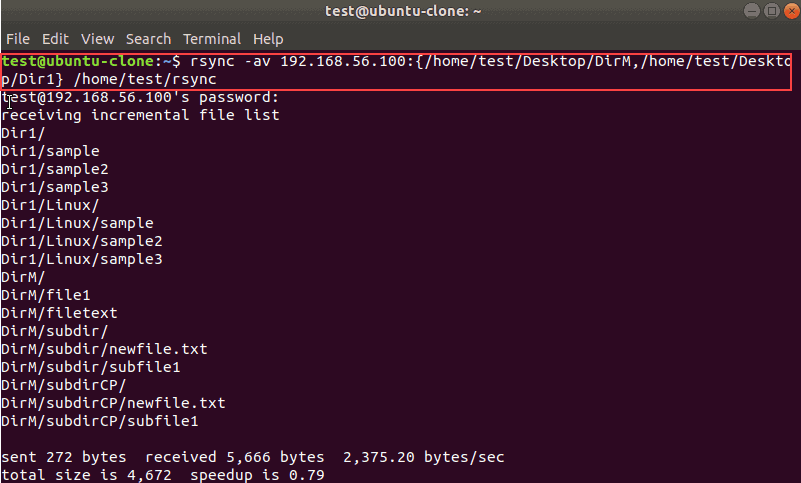
The same goes for the files. List as many files as you need inside the curly brackets.
9. Show rsync Progress During Data Transfer
When performing a large data backup, you may want to view the progress of the transfer.
Add the --progress flag to the rsync command to view the amount of data transferred, transfer speed, and the remaining time.
For example, to backup Dir1 to a remote server and show the progress, enter:
rsync -av --progress /home/test/Desktop/Dir1 192.168.56.100:/home/test/Desktop/rsync
10. Delete a Nonexistent Source File or Directory from Destination
Use the --delete option to keep the source and the target in sync.
This option tells rsync to delete any file or directory at the destination if the source does not have it.
rsync -av --delete /home/test/Desktop/Dir1 192.168.56.100:/home/test/Desktop/rsync
11. Delete Source Files After Transfer
In some scenarios, you may want to delete the source files after the transfer. For example, you may be moving a weekly backup to a new server. Once the transfer is done, you no longer need the source files on the old server.
In that case, use the --remove-source-files flag to delete the source file you specified.
For example, this command transfers the backup file weekly.zip and then deletes it from the source:
rsync -v --remove-source-files /home/test/backup/weekly.zip 192.168.56.100:/home/test/Desktop/rsync/12. Rsync Dry Run
Rsync is a powerful synchronization tool. Since this tool allows you to copy and delete data, we advise you to do a dry run first to test if rsync does what you intended to.
The dry run option is especially useful when you want to delete files. To do a dry run, use the --dry-run option and follow regular rsync syntax.
For example:
rsync -av --dry-run --delete /home/test/Desktop/Dir1 192.168.56.100:/home/test/Desktop/rsync
The output looks the same as when you are actually syncing files. However, this time data will not be synced. To confirm the test took place and not the actual transfer, the terminal shows (DRY RUN) at the bottom.
13. Set Maximum File Size for Transfer
To determine the maximum file size that rsync will transfer, use the --max-size=add_size.
For example, to transfer files no larger than 500KB, use this command:
rsync -av --max-size=500k /home/test/Desktop/Dir1 192.168.56.100:/home/test/Desktop/rsync/14. Set Minimum File Size for Transfer
Use --min-size=add_size with rsync when you do not want to transfer files smaller than the size you specify. This option is useful, for example, when you want to skip small log or thumbnail files.
To skip any file smaller than 10KB, run this command:
rsync -av --min-size=10k /home/test/Desktop/ 192.168.56.100:/home/test/Desktop/rsync/15. Set rsync Bandwidth Limit
If you want to determine the bandwidth limit during data transfer between machines, use --bwlimit=KB/s.
This option is useful when you do not want to clog your network throughput.
To set the maximum transfer speed to 50KB/s, enter:
rsync -av --bwlimit=50 --progress /home/test/Desktop/Dir1 192.168.56.100:/home/test/Desktop/rsync/
We also used the --progress option to demonstrate the usage of --bwlimit.
16. Copy Specific File Type
You can use rsync to copy only a specific file type. To do so, use the asterisk (*) instead of the file name and add the extension.
For example, to copy only .txt files, enter:
rsync -v /home/test/Documents/*.txt /home/test/Desktop/rsync/This rsync command transfers all text files from the Documents directory to the rsync directory on your desktop.
17. Copy Directory Structure but Skip Files
Rsync allows you to transfer only directory structure if you do not need the files at another location.
To do so, add -f"+ */" -f"- *" before the source directory.
For example, to copy the structure of the Linux directory to Documents, enter:
rsync -av -f"+ */" -f"- *" /home/test/Desktop/Linux /home/test/Documents
18. Add Date Stamp to Directory Name
You can easily add a date to a directory name if you want to put a date stamp to your transfers.
Append $(date +%Y-%m-%d) to the destination directory name you want to create. This option is useful when you want to keep track of when transfers took place without opening directory properties.
For example:
rsync -av /home/test/Desktop/Linux /home/test/Desktop/rsync$(date +%Y-%m-%d)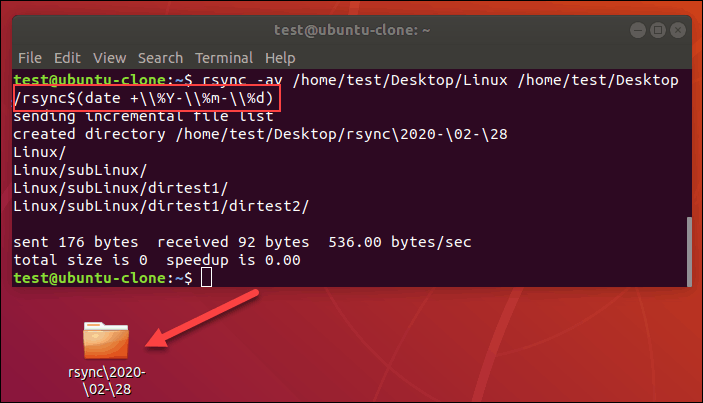
19. Do Not Copy Source File if the Same Destination File is Modified
If you keep in sync two directories, rsync does not copy a file if the same one exists at the destination.
Sometimes it may happen that you modify a file at the destination and do not want to let rsync overwrite it.
To avoid overwriting modified destination files, use the -u option.
For example:
rsync -avu /home/test/Desktop/Linux/ /home/test/Desktop/rsync20. Show the Difference Between the Source and Destination Files
When you start transferring data, you can use the -i flag with rsync to check if there is a difference between the source and the destination.
For example:
rsync -avi /home/test/Desktop/Linux/ /home/test/Desktop/rsync
The example above shows the sample2rs.txt file is missing at the destination.
Possible letters in the output are:
f– stands for filed– shows the destination file is in questiont– shows the timestamp has changeds– shows the size has changed
Conclusion
This guide provided examples of 20 rsync comannds. If you follow this tutorial, you will successfully use rsync to transfer files and directories both locally and to remote locations. Next, learn how to synchronize cache data to permanent system memory to save important files and prevent data loss with the Linux sync command.