Introduction
Public IPs allow you to access a BMC server over the internet and not only inside private networks. PhoenixNAP clients can now enjoy the flexibility when choosing IP blocks and how many IP addresses to purchase. Additionally, you can bring your own public IP blocks to switch to BMC seamlessly and avoid buying new public IPs.
The BMC portal lets you buy and manage Public IP allocations using a streamlined interface. On the other hand, the Public IP APIs are also available for faster and bulk IP management.
In this guide, you will learn how to use the Public IP Allocations feature in the BMC portal, as well as get familiar with the BMC Public IP APIs.
Prerequisites
- BMC or PNCP portal credentials. If you are a new client, create an account for Bare Metal Cloud to deploy a server.
BMC Portal Public IP Allocations Feature
The Public IP Allocations page lets you purchase, view, and manage public IP blocks for your account.
Buy Public IP Allocation via Portal
To buy a public IP block and add more IPs to your pool:
1. Log in to the BMC portal.
2. Navigate to the Networking -> Public IP Allocations page.
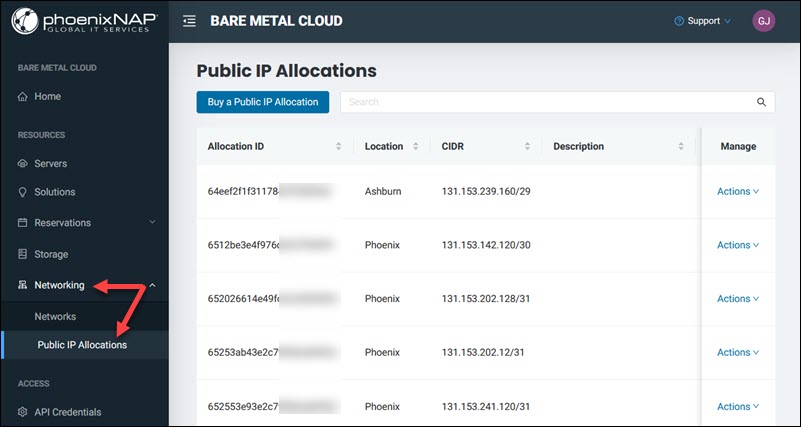
If you have not purchased any public IP blocks yet, the table is empty.
3. Click the Buy a Public IP Allocation button to load the purchase page.
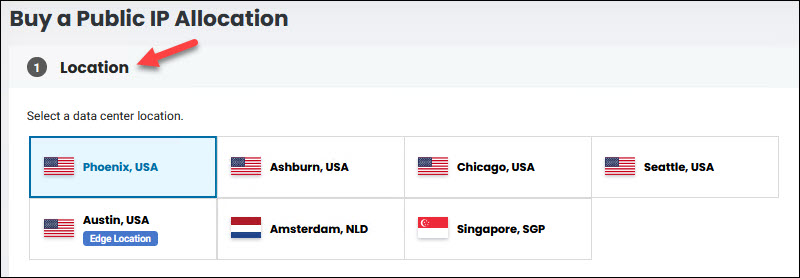
4. Select a data center location for the public IP block. You can only assign IP blocks to the servers and networks in the same data center location.
5. Choose the public IP allocation size to purchase. The smallest IP block is /31 and can only be used for Linux servers. If you plan to assign the IP block to BMC servers with other OSes, please choose at least /30. For networks, the minimum block size is /29.
The total price shown is for the whole IP block. Refer to the BMC Billing Models article for more information.
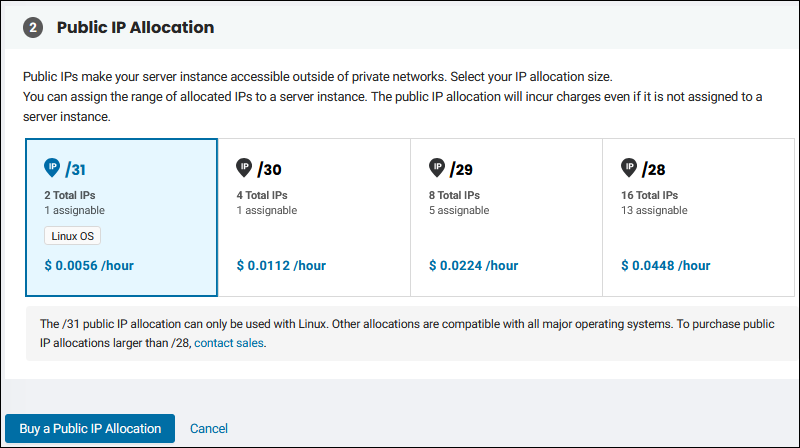
Note: The public IP allocation size you choose must not exceed the total public IP quota for your account. For example, if you have eight public IPs and the quota is 10 for the account, choosing to buy the /29 block does not allow you to complete the purchase. Contact Sales to increase the Public IP quota in that case.
6. Enter a description in the Additional Notes field (optional).
7. Click one of the Buy a Public IP Allocation buttons to complete the purchase.
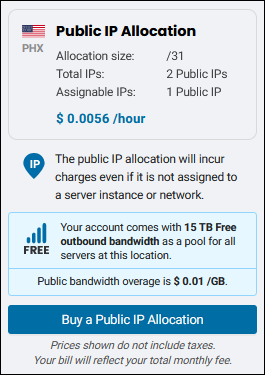
The public IP block appears in the table with the status Not Assigned.
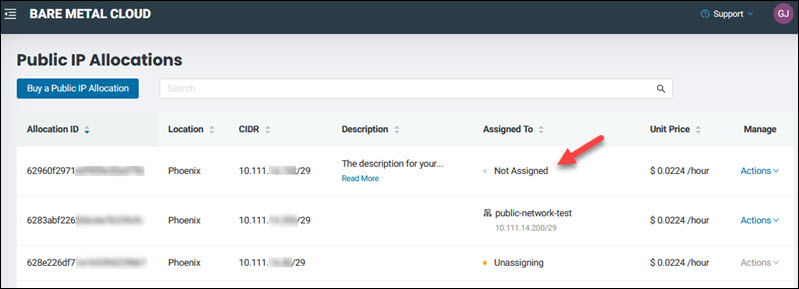
The Assigned To column shows the status of the IP block and the name of the resource when the IP block is assigned.
Bring Your Own (BYO) Public IPs
PhoenixNAP enables an easy transition to BMC by allowing you to bring your own IP blocks. Contact our Support to import your IPs and choose in how many blocks you want to import them. It is not possible to split or merge BYO IP blocks afterward.
Note: The BYO IP blocks are not billed and do not count against the account quota for the allowed quantity of PNAP public IP allocations.
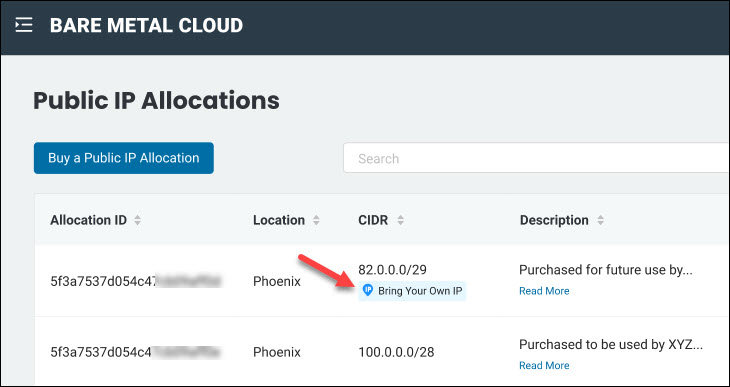
Once Support imports your IP blocks, they appear on the list in the table. There is a label in the CIDR column to identify BYO public IPs:
After that, you can assign them to resources via the portal or API, as well as unassign them the same way as PNAP’s public IPs.
Note: BMC does not support using BYO IP blocks larger than /22.
Assign Public IP Allocation to Resource
To assign a public IP allocation to a BMC resource:
1. Locate the unassigned public IP allocation in the table and click Actions.
2. Select the Assign IP Allocation link.
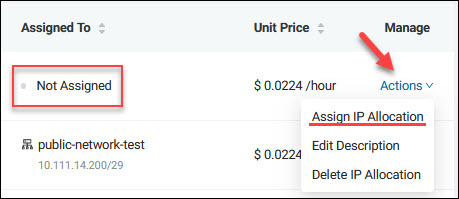
3. Select a server or network from the list.
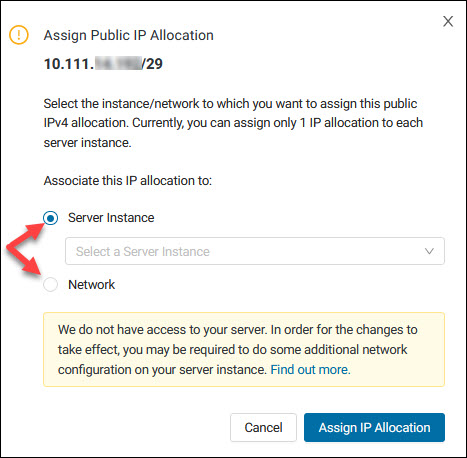
4. Click the Assign IP Allocation button.
When the operation is successful, a confirmation message appears.

If the operation shows an error, please contact Support.
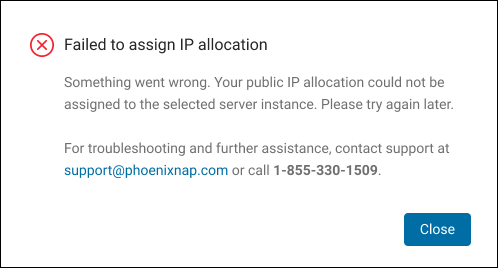
Note: You can assign one public IP block per server. The BMC Portal does not perform any configuration on the server's operating system. You must make network configuration changes in the operating system of the server after you assign an IP block.
Unassign Public IP Allocation from Resource
Removing public IPs from a resource makes it accessible only by private networks or via the remote console. Before unassigning a public IP block, test if the BMC portal remote console access is working.
To unassign a public IP allocation from a server or network:
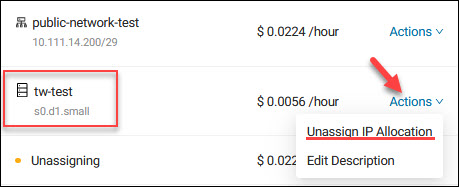
1. Locate the public IP allocation in the table and click Actions.
2. Select the Unassign IP Allocation link.
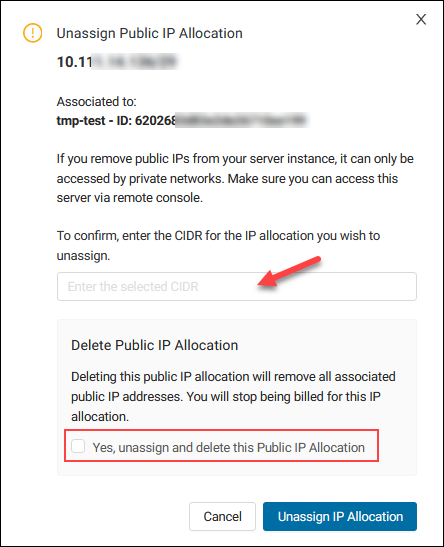
3. Read the notice in the box and enter the CIDR for the IP allocation in question.
4. Click Unassign Public IP Allocation to proceed. The confirmation message appears.

Note: Unassigning a public IP allocation from a resource does not stop the billing. To stop being billed for a public IP block, you must delete it.
To both unassign and delete an IP allocation, select Yes, unassign and delete this Public IP Allocation.
Delete Public IP Allocation
Deleting a public IP allocation from an account removes all its IPs and stops the hourly billing. Only the IP blocks with the status "Not Assigned" can be deleted.
Note: To delete a BYO Public IP from the account, please contact Support to handle this task.
To delete a public IP allocation from the account:
1. Locate the unassigned public IP allocation in the table and click Actions.
2. Select the Delete IP Allocation link.
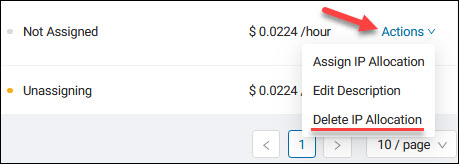
3. Read the notice in the box and enter the CIDR for the IP allocation you want to delete.
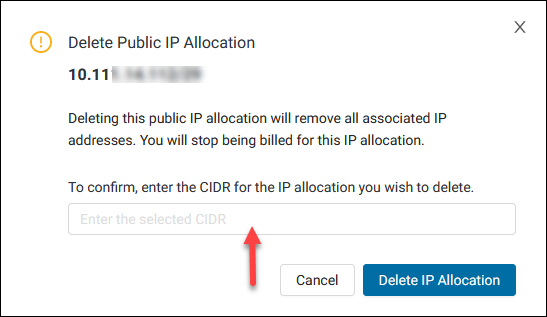
4. Click Delete IP Allocation to confirm the action.
The confirmation message appears when the public IP allocation is deleted.
Note: When you delete an IP block, review any configuration that might be affected by the IP block deletion, such as ACL, DNAT/SNAT and firewall rules, etc.
BMC Public IP Allocations API
BMC public IP allocations APIs cover all the functions you can perform using the BMC portal but with additional flexibility.
Note: BYO IPs cannot be added or deleted via API while all other actions are supported. Please contact Support to board or delete an IP block.
The available locations are:
- Phoenix (PHX)
- Ashburn (ASH)
- Singapore (SGP)
- Netherlands (NLD)
- Chicago (CHI)
- Seattle (SEA)
- Austin (AUS)
Use a CIDR depending on the server OS:
- /31 for Linux only.
- /30 for all operating systems.
- /29 for all operating systems.
- /28 for all operating systems.
Buy Public IP Allocation via API
This API is available at the following URL:
https://api.phoenixnap.com/ips/v1/Use the POST method and the /ip-blocks endpoint to purchase and create a public IP block. The required properties are location and cidrBlockSize.
For example:

Optionally, specify a description and tags for the public IP allocation:
{
  "location": "PHX",
  "cidrBlockSize": "/28",
  "description": "First IP Block",
  "tags": [
    {
      "name": "environment",
      "value": "production"
    }
  ]
}
The response shows the status "unassigned" when the IP block is created as the allocation is not associated with any resource. Note the id of the block for later use.

Get Public IP Inventory Details via API
This API is available at the following URL:
https://api.phoenixnap.com/ips/v1/To view the list of purchased public IP blocks and their details, use the GET method with the /ip-blocks endpoint.
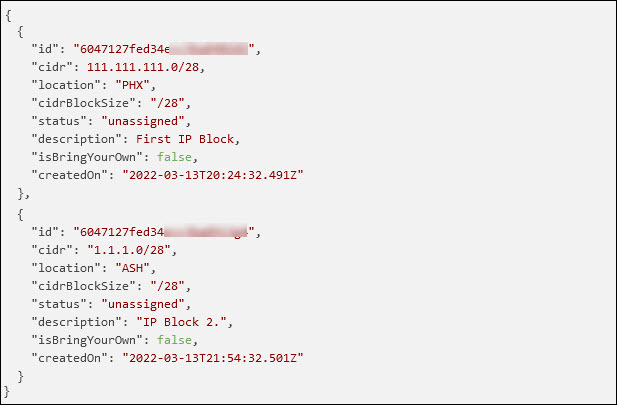
To view the details of a specific IP block, use the /ip-blocks/{ipBlockId} endpoint.
Update Public IP Allocation via API
This API lets you update the IP block description with the PATCH method. Use the following HTTP request URL:
https://api.phoenixnap.com/ips/v1/ip-blocks/{ipBlockId}Specify the new description in the body to update it.
Tag Public IP Allocation via API
The tag IP API HTTP request URL is:
https://api.phoenixnap.com/ips/v1/ip-blocks/{ipBlockId}/tagsUse the PUT method to overwrite assigned tags for the specified IP block. Any tag that is not a part of the request will be unassigned. To keep the existing tags, you must specify them in the request’s body.
For example:
[
    {
      "name": "environment",
      "value": "production"
    },
    {
      "name": "location",
      "value": "phoenix"
    }
]
To filter public IP blocks by tag name, use the ip-blocks/?tag=tagName.tagValue endpoint.
For example:
https://api.phoenixnap.com/ips/v1/ip-blocks/?tag=location.phoenixDelete Public IP Allocation via API
This API is available at the following URL:
https://api.phoenixnap.com/bmc/v1/Deleting a public IP allocation is possible only if the block in question is in the unassigned status and not from the BYO IP pool. When you confirm the status, use the /ip-blocks/{ipBlockId} endpoint with the DELETE method to remove the IP block from your account.
This action stops the IP hourly billing instantly.
Assign Public IP Allocation to Server via API
This IP block API is available at the following URL:
https://api.phoenixnap.com/bmc/v1/Use the /servers/{serverId}/ip-blocks endpoint and the POST method to assign a public IP block to a server. Add the desired IP block's id as the only required parameter in the body.
For example:
{
    id: "60622a6115e37522c9f8f073"
}
Note: The BMC API does not perform any configuration on the operating system but only on the datacenter's networking device. You must make network configuration changes in the operating system of the server.
Use https://api.phoenixnap.com/ips/v1/ip-blocks/{ipBlockId} to verify the IP block status or use the get server details API.

Unassign Public IP Allocation from Server via API
This API is available at the following URL:
https://api.phoenixnap.com/bmc/v1/To remove a public IP block from a server, use the DELETE method with the /servers/{serverId}/ip-blocks/{ipBlockId} endpoint.
Note: This action makes your server unavailable and inaccessible over any network. Before removing a public IP block from a server, make sure you can access the server using the remote console functionality.
The body must include the deleteIpBlocks property. To keep the IP block in your ownership, set the property to false:
{
    "deleteIpBlocks": false
}
If the IP Block is BYO, the deleteIpBlocks property cannot be set to true.
Assign Public IP Allocation to Public Network via API
The API HTTP request URL for adding an IP block to a public network is:
https://api.phoenixnap.com/networks/v1/public-networks/{publicNetworkId}/ip-blocksUse the POST method and specify the public block ID in the body of the request to assign it to the public network from the URL.
For example:
{
  "id": "60473a6115e34466c9f8f083"
}
Unassign Public IP Allocation from Public Network via API
Use the following HTTP request and the DELETE method to remove an IP block from a public network:
https://api.phoenixnap.com/networks/v1/public-networks/{publicNetworkId}/ip-blocks/{ipBlockId}Ensure that resources from the network in question do not have an IP assigned from this block, as the traffic will not be routed after the removal.
Conclusion
This guide showed you how to use the public IP allocations functionality within the BMC portal. Additionally, you learned how to use the corresponding APIs and what to pay attention to.
To learn more about other APIs phoenixNAP offers, visit the Developers Portal.