Introduction
The passwd command modifies passwords for user accounts and manages the password validity period. This is a must-know utility for user account administration.
This article shows examples of how to use the passwd command in Linux, along with all the available options.

Prerequisites
- Access to the terminal
- Superuser or root privileges (sudo)
Note: To check if you have sudo privileges, type sudo whoami in the terminal.
passwd Command in Linux With Examples
Using the passwd command, a superuser changes and modifies settings for any user. Regular users are only allowed to change their own password.
The general command is:
passwd <options> <username>The terminal prints out what user you are changing the password for. Type your current password, and then define and confirm your new password.
For example:

Any password that does not meet basic requirements is rejected and a user must re-enter a new password. Using a strong password is an important security aspect, and it helps prevent brute force attacks.
See Password Status Info
Using passwd with the --status option displays all the information about a password and the validity periods. The shorter version is -S:
passwd --statusOr alternatively:
passwd -S
Check another user’s password status by entering:
sudo passwd -S <username>The password status has seven fields:
1. A user’s login name.
2. Whether a user has a locked password (L), no password (NP), or a password (P).
3. Date of last password change.
4. Minimum password age.
5. Maximum password age.
6. Warning period for password change.
7. Inactivity period for the password change.
The last three fields are in days.
See Password Status Info for All the Accounts
Check the status info for all accounts using passwd with the sudo command with the -S and -a options, or the extended version --all:
sudo passwd --status --allOr:
sudo passwd -S -a
Note: You can create a sudo user and assign elevated permissions. Make sure it’s a trusted user.
Change a User Password
To change a specific user’s password, run the passwd command with sudo privileges and the account you wish to update:
sudo passwd <username>This option comes in handy if a user has forgotten their password.

Note: Reset or change the sudo or root password in case you forget it.
Delete User Password
If a user has a password and you need to remove it, use:
sudo passwd --delete <username>Alternatively:
sudo passwd -d <username>When you check the password status, it changes the second field from P to NP:

The passwd --delete and passwd -d commands are a quick way to disable a password for an account.
Expire Account Password
To force expire a password use the --expire or -e options with the passwd command:
sudo passwd --expire <username>Or:
sudo passwd -e <username>
When you check the status, the date of the last password change is now 01/01/1970. The next time this user logs in, they must change their password.
Set Number of Days After the Password Expires and the Account Deactivates
An account can automatically deactivate after its password has expired and not changed for a certain number of days. Use the -i or --inactive option and set the number of days as an integer:
sudo passwd --inactive <number of days> <username>Or:
sudo passwd -i <number of days> <username>
The last number in the status changes to the number of days you set for that user.
Set the Minimum Number of Days Between Password Changes
To change the minimum number of days between password changes, use the --mindays or -n option with the number of days as an integer:
sudo passwd --mindays <number of days> <username>Or:
sudo passwd -n <number of days> <username>
In the status report for that user, the set number appears after the date.
Set the Maximum Number of Days for Which the Password Remains Valid
To change the maximum number of days between password changes, use the --maxdays or -x option with the number of days as an integer:
sudo passwd --maxdays <number of days> <username>Or:
sudo passwd -x <number of days> <username>
The status of that user shows that maximum number of days for the password validity has changed.
Change the Expired Password
Once a password expires, a prompt appears during next login to change the password. Enter the old password and then a new one twice for confirmation. In this example, the expiry was root enforced:

Note: In this example, the su command switches to the user account, but use the sudo command if possible. Read about the difference between sudo and su.
Display the Warning for Expiring Password
The warning period message displays for expiring passwords. Use the option --warndays or -w to set how many days before the expiry the warning appears:
sudo passwd --warndays <number of days> <username>Or:
sudo passwd -w <number of days> <username>
Lock the Password
Locking a password makes the user unable to log in using their password. However, they are still able to log in using other authentication methods. To lock a password, use:
sudo passwd --lock <username>Or:
sudo passwd -l <username>The password status for that user changes to L. In the example below, it changes from P to L:

Unlock the Password of an Account
To unlock a password for a locked account (L), use the --unlock or -u option:
sudo passwd --unlock <username>Or:
sudo passwd -u <username>The password status changes from locked (L) to the previous state of the password for the account, allowing the user to log in regularly.

Use the Quiet Mode
Quiet mode hides the “Changing the password for <username>” message:
passwd --quietOr alternatively:
passwd -qThe password status changes from locked (L) to the previous state of the password for the account, allowing the user to log in regularly.
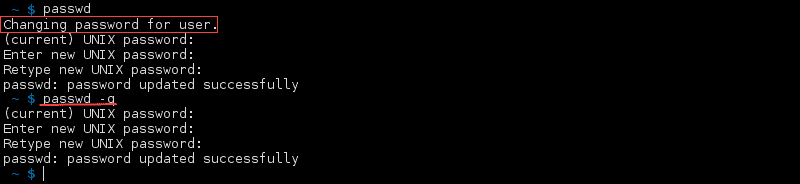
The passwd -q command is useful when you do not want to display the username you are changing the password for on your screen.
Note: When you need to update passwords of multiple users, use the chpasswd command.
Change Password for Repository Named “Repo”
For more advanced usage, the /etc/nsswitch.conf file specifies the repositories where the password changes happen. Specify the repository with the command:
sudo passwd --repository <repository> <username>Or alternatively:
sudo passwd -r <repository> <username>
Change the Root Directory for the passwd Command Process
The passwd command process runs from the default root directory. Modify the root directory by running the --root option:
sudo passwd --root <directory path>Or the -R option:
sudo passwd -R <directory path>You need to set a password for root for the information update.

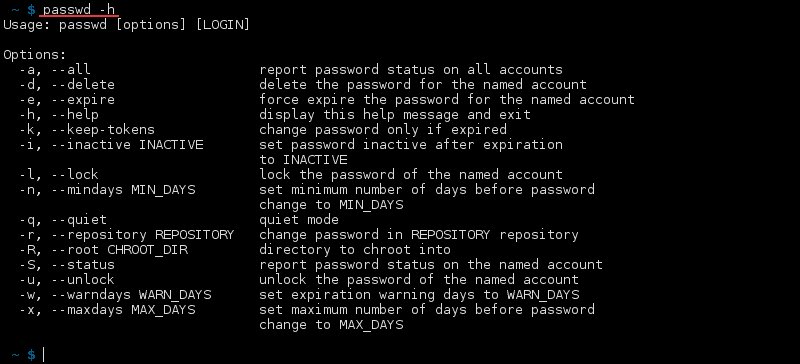
See All passwd Commands
There are numerous commands to use with the passwd tool. List all the options if you forget any by running:
passwd --helpOr:
passwd -hA list of all the options along with a short description prints out:
Conclusion
The passwd command is vital for managing account security, both for an individual user and a system administrator. Automating password validity periods is convenient and easily configurable.
If you find it hard to keep track of all the different passwords and changes, there are many enterprise solutions for password management.
