Introduction
RabbitMQ is an established, general-purpose message broker. A broker facilitates the exchange of messages between a set of distributed microservices and allows them to communicate efficiently and reliably.
Kubernetes, with its API-centric approach, is an ideal operator to deploy RabbitMQ instances in a cluster. Kubernetes’ scaling capabilities and automated container deployment enhance RabbitMQ’s dependability in an extended cluster environment.
This tutorial shows you how to install a RabbitMQ instance on Kubernetes.
Prerequisites
- Access to a terminal window/ command line
- A Kubernetes Cluster
- The Kubernetes kubectl CLI tool
Deploy RabbitMQ on Kubernetes
Installing advanced software solutions on a Kubernetes cluster often involves creating and editing several complex configuration files.
Helm, the Kubernetes application package manager, can streamline the installation process and deploy resources throughout the cluster very quickly. To successfully deploy RabbitMQ, we will have to install the Helm package manager.
Install Helm Package Manager
Use the following command to install the latest version of Helm on your local Kubernetes cluster:
curl -fsSL -o get_helm.sh https://raw.githubusercontent.com/helm/helm/master/scripts/get-helm-3chmod 700 get_helm.sh./get_helm.shOnce the installation process has been completed, initiate the Helm package manager by typing the following command:
helm initYou can now use Helm to deploy resources throughout a cluster with a few short commands.
Create a Namespace for the RabbitMQ Deployment
All resources in Kubernetes are started in a namespace. Unless one is specified, the system uses the default namespace. To have better control over the deployment process use the following command to create a distinct namespace:
kubectl create namespace rabbitYou can use any DNS compatible name. The namespace we created is named: rabbit.

The system confirms that the namespace has been created successfully.
Install RabbitMQ on Kubernetes
With Helm successfully installed and a designated namespace you are ready to start the RabbitMQ deployment process. Enter the following command to apply a default stable/rabbitmq chart from a git repository:
helm install mu-rabbit stable/rabbitmq --namespace rabbitThe command deploys RabbitMQ on the Kubernetes cluster in the default configuration. The deployment is executed in the rabbit namespace created previously.
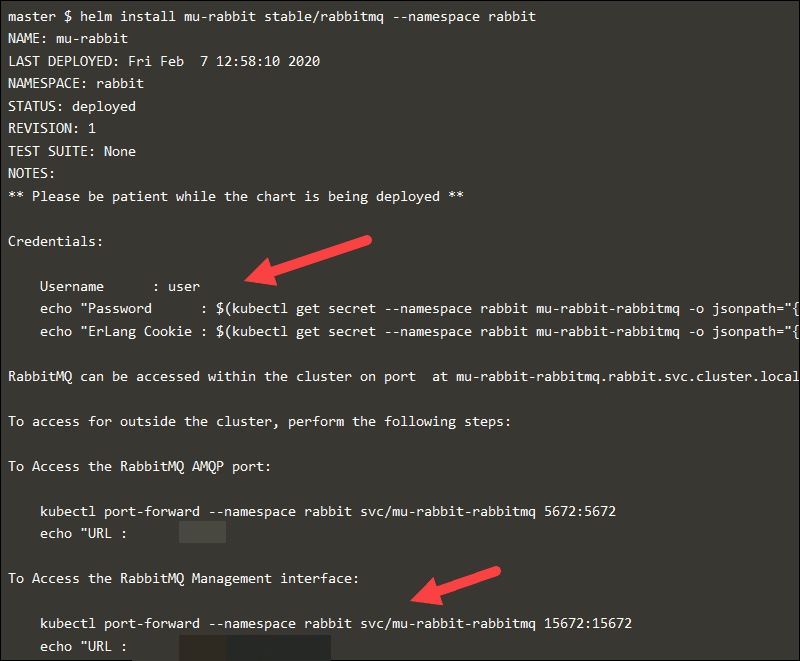
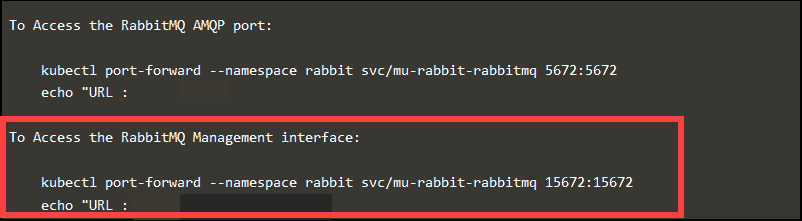
The terminal provides the information you need to access the RabbitMQ management interface from your browsers such as the credentials, port number, and URL.
Check RabbitMQ Provisioning Status
The containers might take a few moments to deploy. The complete status of the provisioning sequence can confirm if a deployment was successful. To review the details of the deployment, enter the following command:
watch kubectl get deployments,pods,services --namespace rabbitA shell within the terminal provides the details for the rabbit namespace.
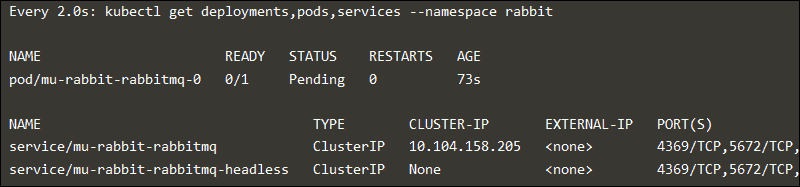
Once you are ready to exit the monitoring shell press Ctrl+C.
Configure RabbitMQ Server
Settings for the RabbitMQ server and its plugins are edited within the RabbitMQ configuration files.
You can use your preferred text editor to access and configure the rabbitmq.conf file. The configuration file syntax uses the sysctl format, and there are several basic principles to adhere to:
- The system does not execute lines that start with a
#character, as it considers them to be a comment - You can define only one setting per line
- The lines use a simple Key = Value structure
The rabbitmq.conf file allows you to define most of the necessary configuration items, such as ports, memory thresholds, disk space, or permissions to connect to the broker.
The RabbitMQ server source repository provides a comprehensive example of a rabbitmq.conf file with detailed comments. It is important to note that this example file represents a general guide and should be adapted to reflect the specific needs of your system.
Note: Versions preceding RabbitMQ 3.7.0 use a different configuration file name, rabbitmq.config.
Setting up RabbitMQ Management Plugin to enable GUI
The RabbitMQ management plugin is already available in the default distribution. Use the rabbitmq-plugins command to enable the service:
rabbitmq-plugins enable rabbitmq_managementAccess the RabbitMQ graphical interface by using the IP and port number for the RabbitMQ server. Enter the following web location format in your browser:
http://rabbitmq-ip-or-server-name:15672/The IP and port number were provided during the installation process.
The service asks for your credentials. To gain access to the UI need to enter your username and password. On new RabbitMQ installations, the default username and password are both predefined as “guest.”
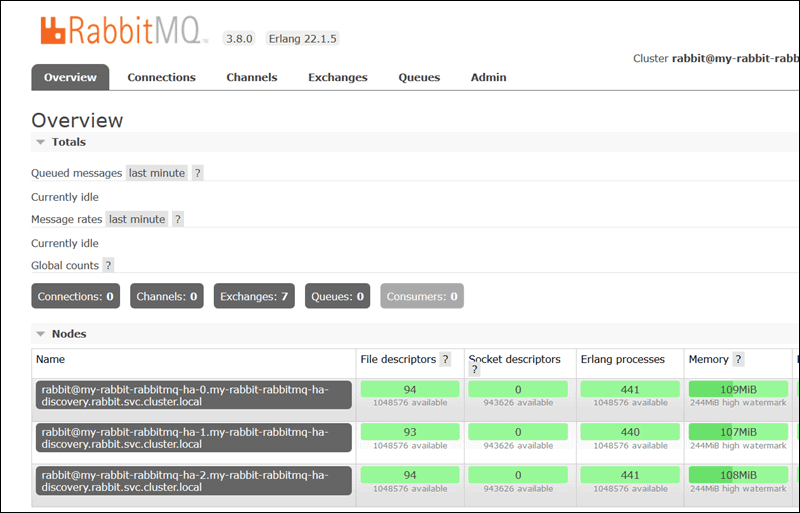
You now have access to a user-friendly environment that allows you to manage virtual hosts, queues, permissions, and exchanges.
How RabbitMQ works on Kubernetes?
The very purpose of Kubernetes is to orchestrate services and automate jobs in a highly distributed cluster. A messaging broker like RabbitMQ can enhance the quality of long-running tasks and stabilize vital background processes.
RabbitMQ uses the Advanced Message Queuing Protocol (AMQP) to standardize messaging between Producers, Brokers, and Consumers.
- A Producer publishes a message to the Exchange.
- The Exchange formats the message and forwards it to a predefined and selected Queue.
- A Consumer then retrieves the formatted message and consumes it.
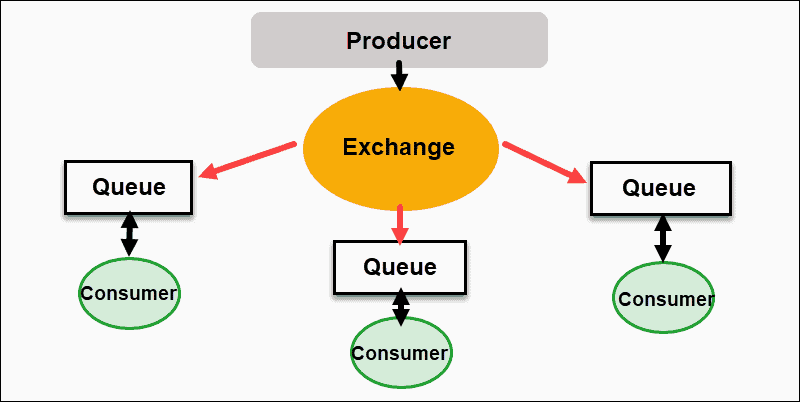
The systematic distribution of messages improves communication between loosely coupled applications and services.
Conclusion
You have successfully installed RabbitMQ on Kubernetes by using the Helm package manager. The services deployed in your cluster are now able to communicate much more efficiently than before.
You have also gained access to the RabbitMQ management plugin. The straightforward user interface helps you manage messaging queues effectively and ultimately reduces the loads and delivery times of your web application servers.
