Introduction
The .htaccess file handles server configuration and WordPress website requests. It controls various server-side functionalities, including URL redirection, server signatures, file caching, password protection, and customizing error pages.
Knowing how the .htaccess file works helps control website behavior and optimizes performance.
This tutorial will show you how to find, edit, and create the default .htaccess file in WordPress.
What Is .htaccess File?
The .htaccess (hypertext access) file is a standard configuration file used in web servers, most notably with Apache servers but also with WordPress. It is a plain text file with various configuration directives in a website's root directory.
Note: If you're using Apache servers, check out how to enable and set up a .htaccess file in Apache.
Editing and modifying a .htaccess file is typically done to grant or revoke access to website resources. The leading dot means the file is hidden (dotfile). Adjust the settings of the default file manager to make the file visible and editable.
What Is .htaccess File Used For?
The standard use of the .htaccess file in WordPress is to handle permalinks for a website. However, there are additional configuration options beyond permalink management that improve a website's behavior.
Common uses and benefits are in the table below:
| Function | Description |
|---|---|
| Redirecting and rewriting URLs | URL redirections and rewriting modify website navigation and improve SEO. It also enables the creation of readable and descriptive website URLs. |
| Preventing image hotlinking | Securing website resources stops others from linking images or other resources hosted on the server. This reduces server load, bandwidth usage, and potential theft. |
| Server error handling | Creating custom error pages and providing detailed messages improves appearance and simplifies troubleshooting during server errors. |
| Blacklisting and whitelisting IP addresses | Allowing or blocking specific IP addresses refines website access rules. Selectively blocking or enabling access to the website provides an additional security layer. |
| Blocking users based on referring URL | Preventing access based on the referring URL is a way to control website access and traffic. It also provides an additional security layer by filtering unauthorized referring URLs and preventing spam sources. |
| Implementing password protection | Using password protection on specific pages or directories restricts access to valid users. |
By using the .htaccess file, WordPress administrators can modify and secure a website according to specific requirements.
Note: Refer to our guide to also learn how to make a redirect in PHP.
How to Find WordPress .htaccess File
The .htaccess file is in the root directory of a WordPress installation. To find the file, modify the default file manager settings to make hidden files visible.
Depending on the setup, the sections below show how to change these settings to view the .htaccess file via cPanel and an FTP client.
Note: FTP stands for file transfer protocol. If you're using Ubuntu, follow our step-by-step guide to install an FTP server on Ubuntu.
Find WordPress .htaccess File Using cPanel
To find the .htaccess file using cPanel, follow the steps below:
1. Log in to the cPanel dashboard using your credentials.
2. In the Files section, locate and open the File Manager.
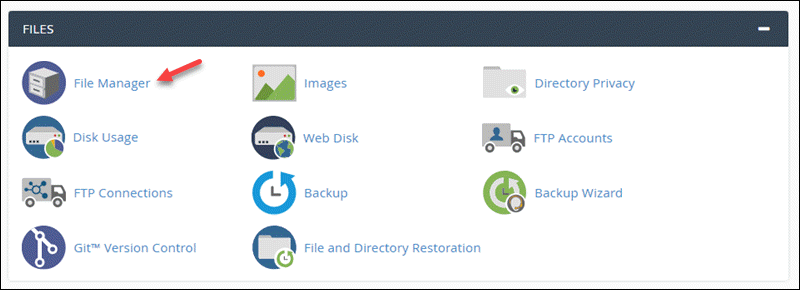
3. Find and select the folder related to the WordPress installation (usually www or public_html). If it is not immediately visible, the file is hidden.
4. To make the file visible, click the Settings button in the top right corner.
5. Check Show Hidden Files and click Save.
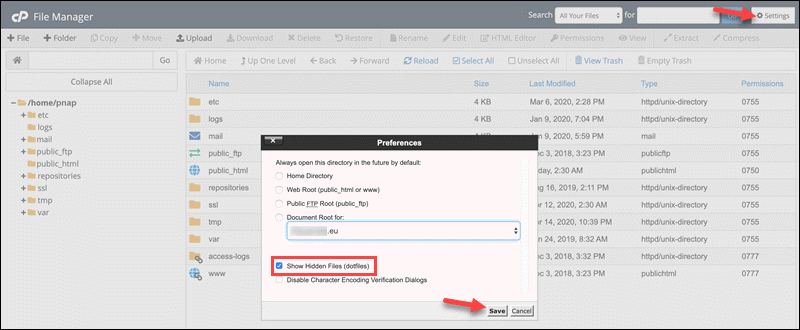
The file is now visible in the current folder.
Find WordPress .htaccess File via FTP Client
To find the .htaccess file via an FTP client (such as Filezilla or WinSCP), do the following:
1. Connect to the WordPress website using an FTP client.
2. Navigate to the website's root folder (typically www or public_html).
3. Configure the FTP client to show invisible files if the .htaccess file is not immediately visible. If using FileZilla, go to Server > Force showing hidden files.
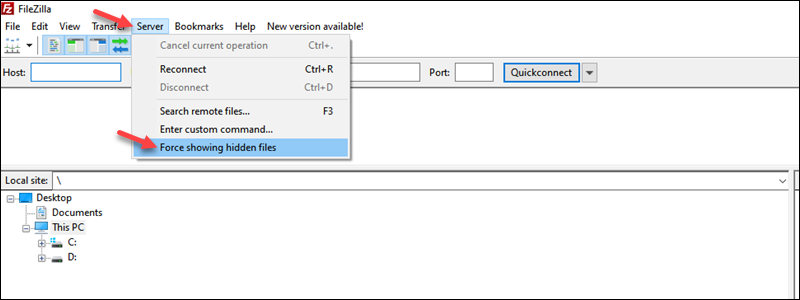
4. Once configured, the .htaccess file is visible in the current folder.
How to Create a Default WordPress .htaccess File
In some instances, WordPress does not create the default .htaccess file, or it is deleted. See the steps below to create a .htaccess file manually:
1. Navigate to the WordPress root installation folder (public_html or www).
Note: Ensure that hidden files are visible. Refer to the previous section to see instructions on how to show hidden files.
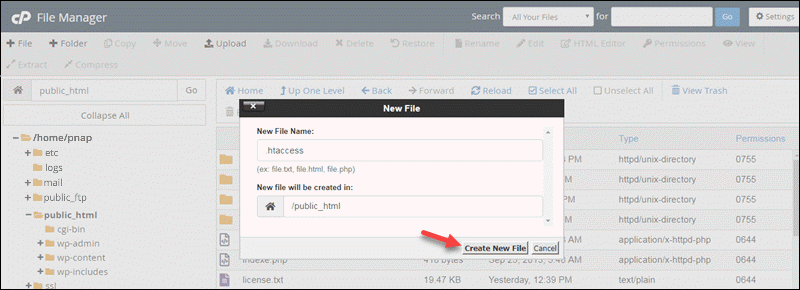
2. Click the + File button in the upper-left corner to create a new file.
3. Name the file .htaccess and click Create new file.
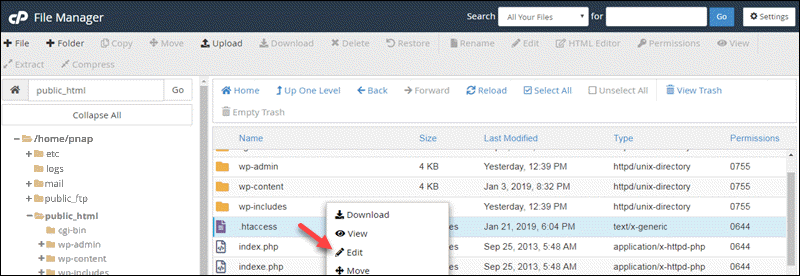
4. Open the file for editing. If using cPanel, select the file. Click Edit in the top bar or right-click the file, then Edit.
5. Add the following to the file:
# BEGIN WordPress

RewriteEngine On
RewriteBase /
RewriteRule ^index\.php$ - [L]
RewriteCond %{REQUEST_FILENAME} !-f
RewriteCond %{REQUEST_FILENAME} !-d
RewriteRule . /index.php [L]

# END WordPress
The provided code is the default .htaccess that WordPress generates automatically. It handles permalink structures and URL rewriting.
6. Save the file and exit.
How to Edit WordPress .htaccess File
Editing the .htaccess file allows customizing server configuration and enables adding various functionalities to a WordPress website. Follow the instructions below to edit the .htaccess file in cPanel and with an FTP client.
Editing .htaccess in cPanel
To edit the .htaccess file in cPanel, do the following:
1. Save a copy to the local machine before making any changes. Select the .htaccess file, right-click it, and choose Download.
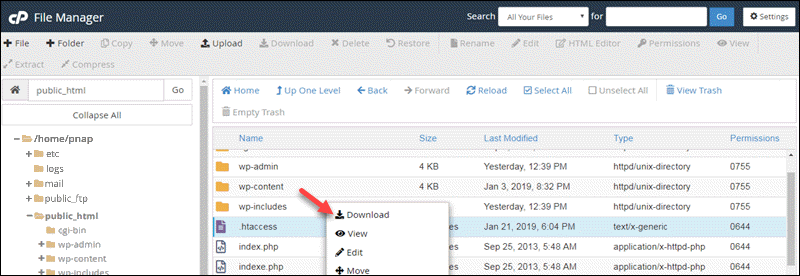
The saved copy serves as a backup in case of any errors.
2. Edit the original .htaccess file in cPanel. Right-click the file, then click the Edit button to adjust it.
Editing .htaccess File with FTP Client
If using an FTP client to access the .htaccess file for editing, do the following:
1. Navigate to the root folder for the domain.
2. Right-click and choose Download to save the .htaccess file locally.
3. To edit the file, right-click the original and choose View/Edit. Use the local copy to revert to the original configuration quickly.
Note: If you are working from a Linux terminal, you can edit the file in nano by entering: sudo nano [root_directory]/.htaccess.
WordPress .htaccess: Common Configurations
Various configuration options are available when customizing a WordPress website via the .htaccess file. Below are some standard configurations that WordPress administrators use to manage website behavior and improve security.
Redirections
Redirections control website traffic flow. They ensure users land on the right pages and URLs. Common redirection situations include the following:
- 301. When a website's permalink changes, use a 301 redirect to redirect traffic to a new page. Users with bookmarks or hyperlinks route to the live page. Use the following format in the .htaccess file for all pages that require redirection:
Redirect 301 /[old_permalink].html [website_URL]/[current_permalink].html- 302. To temporarily redirect traffic to another page, use a 302 redirection. The short-term changes are suitable for testing purposes. Use the following syntax:
Redirect 302 /[old_permalink].html [website_URL]/[current_permalink].html- Subdirectory. Use redirection to navigate traffic from one subdirectory within the website to another. This redirection type is beneficial when combining or restructuring a website's contents. The format is:
Redirect /[subdirectory] [website_URL]/[new_subdirectory]
- Different domain. Some cases require redirecting traffic to another domain or a completely different website. The redirection appears in affiliate marketing, domain name variations, rebranding, or domain migration. The syntax is:
Redirect / [new_website_URL]Force www or Non-www
Forcing or removing the www prefix for a WordPress website is a standard task for the .htaccess file. The main benefits are SEO and branding consistency. Forcing www or non-www also avoids potential duplication issues due to URL differences.
Add the following directives to the file to force www for a website:
RewriteEngine On
RewriteCond %{HTTP_HOST} !^www\. [NC]
RewriteRule ^ https://www.%{HTTP_HOST}%{REQUEST_URI} [L,R=301]
Alternatively, use the following example to force non-www for a website:
RewriteEngine On
RewriteCond %{HTTP_HOST} ^www\.(.*)$ [NC]
RewriteRule ^ https://%1%{REQUEST_URI} [L,R=301]
In both examples, the .htaccess configuration redirects incoming requests to include or exclude the www prefix.
Force HTTP or HTTPS
The .htaccess file enables HTTP or HTTPS to be forced on a WordPress website. Forcing HTTPS improves website security, which creates a trustworthy and credible image. On the other hand, forcing HTTP is common practice in intranets, closed networks, and for testing purposes.
To force HTTPS, add the following directives to the .htaccess file:
RewriteEngine On
RewriteCond %{HTTPS} off
RewriteRule ^ https://%{HTTP_HOST}%{REQUEST_URI} [L,R=301]
Alternatively, to force HTTP on a WordPress website, use the following example:
RewriteEngine On
RewriteCond %{HTTPS} on
RewriteRule ^ http://%{HTTP_HOST}%{REQUEST_URI} [L,R=301]
In both cases, the rewrite condition checks whether HTTPS is on and rewrites the URL accordingly based on the result of that check.
WordPress .htaccess Security Tips
The .htaccess file features various security-related directives. Adding these directives improves website security and helps mitigate potential attacks from a WordPress website. Below are essential security tips and measures specifically related to the .htaccess file.
Note: Looking to secure your WordPress website? Check our review of the Best WordPress security plugins.
Restrict Access
WordPress contains various files with sensitive information that should not be publicly available. To prevent unauthorized access to files such as .htaccess, .htpasswd, and wp-config.php, see the following example:
<FilesMatch "^.*(\.htaccess|\.htpasswd|wp-config\.php)$">
Order allow,deny
Deny from all
</FilesMatch>
The code matches the file names and prevents access to all clients. Change the regex to add other sensitive files and restrict access to additional data.
Disable Directory Listing
Disable directory listings to block unauthorized users from viewing the server's contents and directories. The following directive disables directory listing access:
Options -IndexesThe directive prevents viewing directory contents that do not contain an index file (such as index.php).
Prevent Image Hotlinking
Preventing image hotlinking protects a WordPress website's bandwidth and resource usage. Use the following rule example to protect images hosted on the server:
RewriteEngine on
RewriteCond %{HTTP_REFERER} !^$
RewriteCond %{HTTP_REFERER} !^http(s)?://(www\.)?yourdomain.com [NC]
RewriteRule \.(gif|jpg|jpeg|png)$ - [NC,F,L]
The condition checks the request for an image file and prevents access if it does not match the example domain. If the request fails the condition, the page returns a 403 error, preventing hotlinking.
Limit Uploads
Limiting specific file type uploads helps prevent users from uploading suspicious files and scripts. To limit file uploads, use the following example as a reference:
<FilesMatch "\.(exe|php|sh)$">
Order allow,deny
Deny from all
</FilesMatch>
The directive blocks uploading files that end in .exe, .php, or .sh, which are typical for script files.
Conclusion
After reading this guide, you can find, edit, and create the default WordPress .htaccess file. Knowing how to edit the file helps resolve many common WordPress errors, including the Uploaded file exceeds the upload_max_filesize directive in php.ini and the 500 internal server error.
Next, check our WordPress performance and optimization tips.

